Answered By: Arnetta Henderson Last Updated: Jul 16, 2024 Views: 70
-
In your Word document, click the image to select it.
-
Click the contextual tools page.
If you select a photograph or clip art, click the Picture Tools page.
-
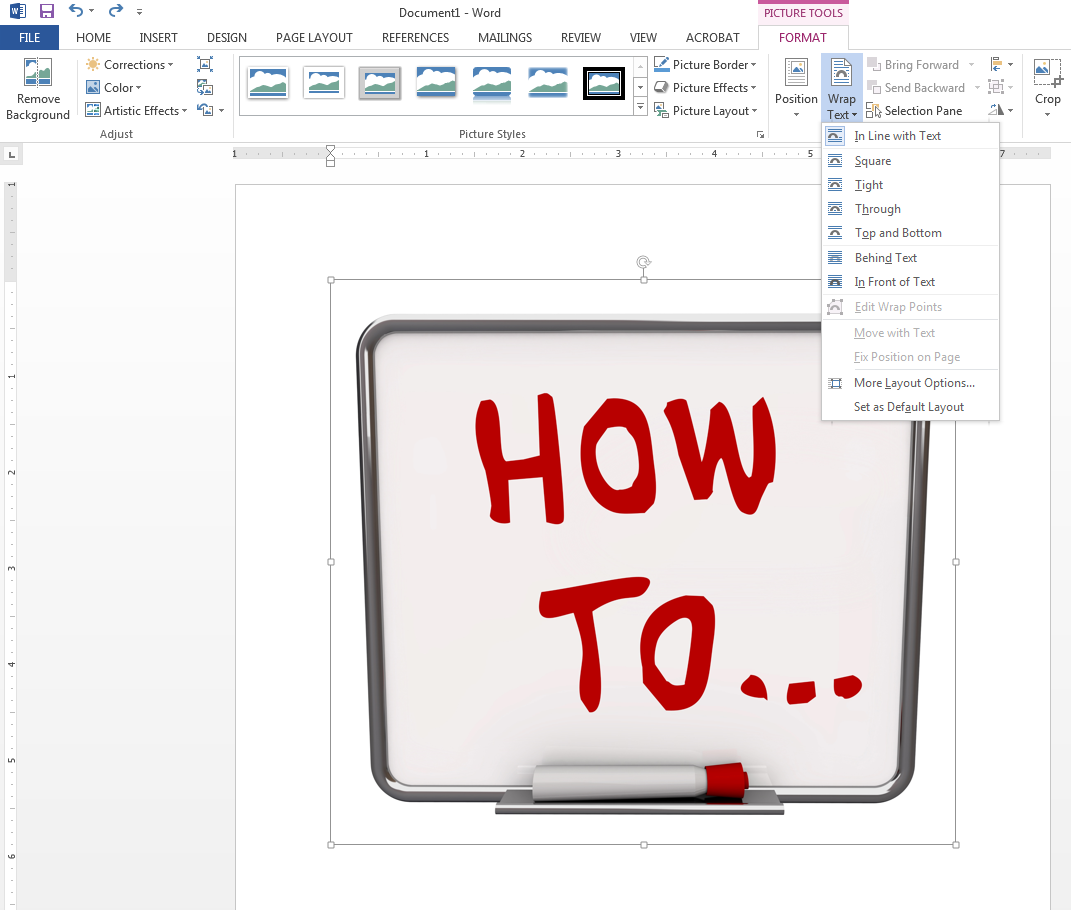
In the Arrange group, click Wrap Text.
-
Do one of the following:

-
If you click the In Line with Text option, your image stays with the text that comes before and after it.
-
Click Square to wrap text around the border of your image.
-
Click Tight to wrap text closely around a clip art image or an irregularly shaped picture.
-
Click Through and then click Edit Wrap Points to drag the wrap points closer to the image, so that text can fill in more of the negative space around the image.
-
Click Top and Bottom to place the image on its own line.
-
Click Behind Text to display the text over the image.
-
Click In Front of Text to display the image over the text.
-
Click More Layout Options and then click the Text Wrapping page to change where the text wraps or the distance between the text and the image.
Was this helpful? 0 0
Comments (0)
Answers by Topic
- About the Library
- Textbook Checkout & Course Reserves
- Printing
- Books
- Library Lab
- Articles
- COM
- Databases
- Citation/Style: MLA
- Microsoft Word
- Borrowing Library Items
- Database: OneSearch
- Research
- COM: Bookstore
- eBooks
- Citation/Style: APA
- Distance Ed
- Citation
- Hot or Controversial Topics
- Fax/Scan
- Computers & Tech (Help)
- Literature
- American Literature
- Microsoft PowerPoint
- Home Access
- Nursing
- COM ID
- Adobe
- Internet
- Database: EBSCO
- Copiers
- Health & Medicine
- American History
- Scholarly/Peer Reviewed
- Social Sciences
- GED
- English
- Government & Law
- Study Guides, Tests & Testing
- Psychology
- Files & Drives
- Literary Criticism
- Database: ProQuest
- Papers & Writing
- Wi-Fi
- Database: CINAHL
- Study Rooms
- Database: EBSCO eBooks
- Faculty
- Database: JSTOR
- History
- Speech
- Adult Education
- Research Tutorial
- British Literature
- COM: WebAdvisor
- Interlibrary loan (ILL)
- Media
- Games & Puzzles
- Database: Gale
- World History
- Science
- Education
- Database: Opposing Viewpoints
- Guides
- Library Fees
- Careers
- Humanities
- Business
- Database: Issues & Controversies
- Microsoft Excel
- Microsoft Office 365
- Biology
- Philosophy
- Reference
- Computers & Tech (Research)
- Industrial
- Database: Films on Demand
- World Literature
- Primary Sources
- Database: Hoopla
- Journals
- MAC
- Texas
- YouTube
- Communication
- Ethics
- Math
- Google Scholar
- Microsoft Office
- Streaming Media
- Religion
- News
- Database: LearningExpress
- Crtitcal Thinking & Information Literacy
- Sociology
- Database: Infobase
- Criminal Justice
- African Americans
- Citation/Style: GSA
- Local
- Drama
- CHS
- Database: CQ Researcher
- Mobile
- Gender
- iOS, iTunes
- Database: Gale eBooks
- zoterbib
- Statistics
- COM History
- Music
- Coronavirus
- Database: Britannica
- Environment
- Database: World News Digest
- Athletics & Sports
- Film
- Poetry
- Language
- Open Access
- Testing
- Geography & Travel
- Economics & Finance
- Geology
- Nutrition
- Native Americans
- Scan
- Art
- British History
- Citation/Style: ACS
- Citation/Style: Chicago
- Plagiarism
- Fine Arts
- ESL
- Chemistry
- Hispanic
- Library Spaces
- COM: Course Evaluations
- Child Development
- Astronomy
- Welding
- Texas History
- Citation/Style: Harvard
- Copyright & Fair Use
- Stephen King
- LGBT
- Advising and Student Support
- Copyright & Fair Use for Faculty
- Photography
- Undead
- Citation/Style: ASA
- Citation/Style: Turabian
- Database: Science Online
- Yahoo!
- Spanish
- Database: Swank
- Database: MLA Handbook
- Reading
- Database: CREDO
- Safety
- Citation/Style: AMA
- Kindle
- Disasters
- College Success Academy
- Media Services
- Holds
- Cosmetology
- Mythology
- Anthropology
- Botany
- Microsoft Outlook
- Blackboard
- Pages for MAC
- Microsoft Windows
- Database: Academic Video Online (AVON)
- Database: Academic Search Complete
- Genetics
- Android
- Database: Science in Context
- Social Work
- Genealogy
- Bibliography
- Law
- calculators
- Bias
- Database: American History Online
- EMS
- Firefighting
- Physics
- Anatomy
- Fashion
- SAT
- Library Instruction
- Sports
- Taxes
- Google Docs
- COM Learning Locations
- Accessibility
- AI, Artificial Intelligence
- Generative AI
- Database: WorldCat
- Microsoft Access
- LibChat
- Asian Americans
- Database: TDS STAT!Ref
- Roku
- Google Slides
- Fax
- Culture
- Critical Thinking
- Database: O'Reilly
- Database: Ebook Central
- Database: Libby eBooks
- Allied Health
- Conflict


